Renegade54 (talk | contribs) m (formatting, linkfix) |
No edit summary Tag: sourceedit |
||
| (20 intermediate revisions by 14 users not shown) | |||
| Line 1: | Line 1: | ||
| − | The '''decks''' of an {{ |
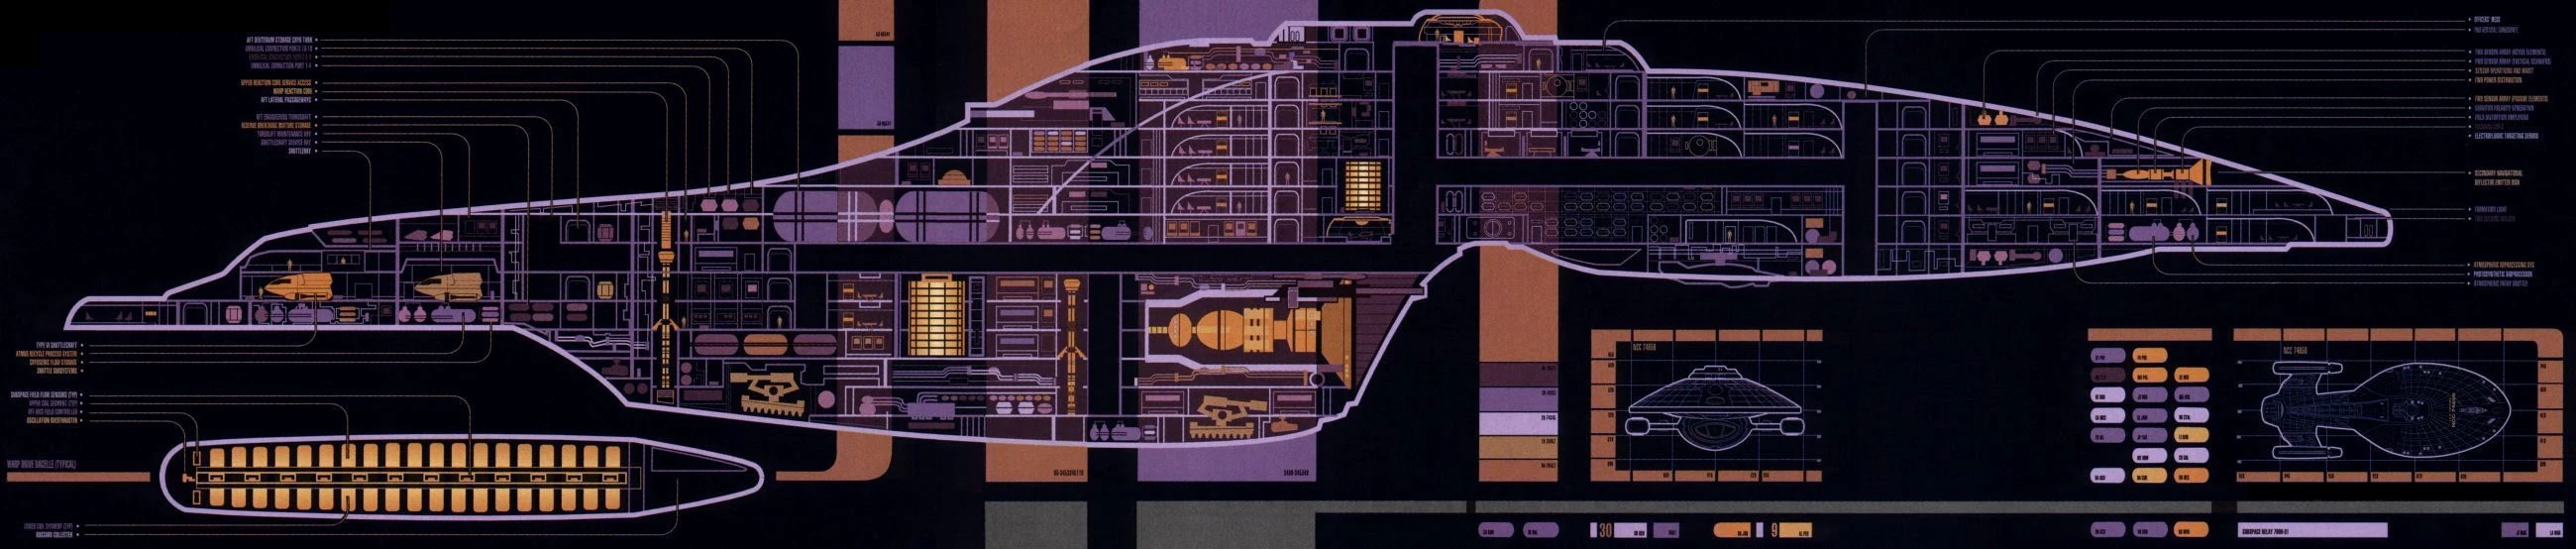
+ | The '''decks''' of an {{class|Intrepid}} [[Federation]] [[starship]]: |
| + | |||
| + | [[File:Intrepid class MSD.jpg|center|670px|''Intrepid''-class master systems display]] |
||
* '''Deck 1''' |
* '''Deck 1''' |
||
** [[Bridge]] ({{VOY|Caretaker}} et al.) |
** [[Bridge]] ({{VOY|Caretaker}} et al.) |
||
| − | ** [[Captain's ready room]] ({{VOY|Caretaker}} et al.) |
+ | ** on the [[starboard]] side ({{VOY|Good Shepherd}}): [[Captain's ready room]] ({{VOY|Caretaker}} et al.) |
** [[Briefing room]] ({{VOY|Parallax}}) |
** [[Briefing room]] ({{VOY|Parallax}}) |
||
* '''Deck 2''' |
* '''Deck 2''' |
||
| − | ** [[Captain's Private Dining Room]], cabin 125 |
+ | ** [[Captain's dining room|Captain's Private Dining Room]], [[cabin]] 125 Alpha; Section 13 ({{VOY|Phage|Macrocosm}}) |
| − | *** [[ |
+ | *** [[Mess hall]] ({{VOY|Learning Curve}}) |
* '''Deck 3''' |
* '''Deck 3''' |
||
** Officers' and VIP Quarters |
** Officers' and VIP Quarters |
||
| ⚫ | |||
* '''Deck 4''' |
* '''Deck 4''' |
||
** [[Transporter room]]s 1 and 2 ({{VOY|Phage}}) |
** [[Transporter room]]s 1 and 2 ({{VOY|Phage}}) |
||
** Energy grid, location of [[bio-neural gel pack]]; section 9C ({{VOY|Learning Curve}}) |
** Energy grid, location of [[bio-neural gel pack]]; section 9C ({{VOY|Learning Curve}}) |
||
| − | ** Cargo |
+ | ** Cargo bay 2 ({{VOY|Maneuvers}}) |
| − | ** Crew quarters |
+ | ** Crew quarters ({{VOY|Twisted}}) |
| − | [[ |
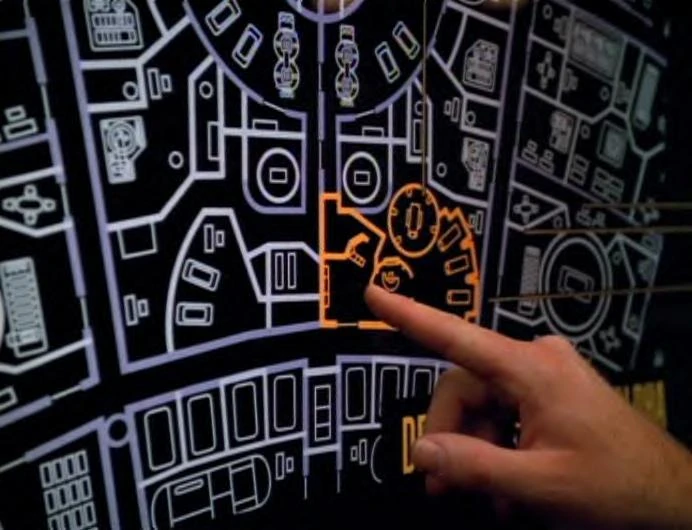
+ | [[File:Deck 5 section 15 alpha.jpg|thumb|Schematic of Deck 5, Section 15 Alpha]] |
* '''Deck 5''' |
* '''Deck 5''' |
||
** [[Sickbay]] ({{VOY|Tuvix}}) |
** [[Sickbay]] ({{VOY|Tuvix}}) |
||
| − | ** Doctor's Office ({{VOY|Tuvix}}) |
+ | ** [[The Doctor]]'s Office ({{VOY|Tuvix}}) |
* '''Deck 6''' |
* '''Deck 6''' |
||
| − | ** Holodeck Two ({{VOY|Twisted}}) |
+ | ** [[Holodeck]] Two ({{VOY|Twisted}}) |
| − | ** |
+ | ** Energy Grid Beta four - location of [[bio-neural gel pack]] ({{VOY|Learning Curve}}) |
| − | ** Energy grid beta four, location of [[bio-neural gel pack]] ({{VOY|Learning Curve}}) |
||
| − | ** Shuttle Bay 2; between sections 21 through 27 Alpha ({{VOY|Threshold}}) |
||
** [[Armory]] |
** [[Armory]] |
||
| ⚫ | |||
* '''Deck 7''' |
* '''Deck 7''' |
||
** [[Jefferies tube]] A-17; section 13-alpha ({{VOY|Cathexis}}) |
** [[Jefferies tube]] A-17; section 13-alpha ({{VOY|Cathexis}}) |
||
** Communication line access panel ({{VOY|Meld}}) |
** Communication line access panel ({{VOY|Meld}}) |
||
| − | ** Crew quarters |
+ | ** Crew quarters ({{VOY|Twisted}}) |
* '''Deck 8''' |
* '''Deck 8''' |
||
| ⚫ | |||
** Cargo Bay 2; Section 4 ({{VOY|Drone}}) |
** Cargo Bay 2; Section 4 ({{VOY|Drone}}) |
||
| + | ** [[Science lab]]; Section 22 ({{VOY|Drone}}) |
||
| ⚫ | |||
* '''Deck 9''' |
* '''Deck 9''' |
||
| − | ** Crew quarters |
+ | ** Crew quarters: Section 12 ({{VOY|Someone to Watch Over Me}}), Section 22 ({{VOY|Equinox}}) and |
| − | ** |
+ | **Section 23 ({{VOY|Infinite Regress}}) |
* '''Deck 10''' |
* '''Deck 10''' |
||
** [[Shuttlebay]]; Junction 32-Alpha ({{VOY|The Raven|Macrocosm|Alice}}) |
** [[Shuttlebay]]; Junction 32-Alpha ({{VOY|The Raven|Macrocosm|Alice}}) |
||
| + | [[File:Voyager deuterium tank failure.jpg|thumb|Engineering section cutaway]] |
||
| + | ** Crew quarters; ({{VOY|Macrocosm}}) |
||
* '''Deck 11''' |
* '''Deck 11''' |
||
| Line 57: | Line 60: | ||
* '''Deck 13''' |
* '''Deck 13''' |
||
| − | **''Located 10 meters below |
+ | **''Located 10 meters below Engineering ({{VOY|Emanations}})'' |
* '''Deck 14''' |
* '''Deck 14''' |
||
| + | **''Stasis Units ({{VOY|One}})'' |
||
* '''Deck 15''' |
* '''Deck 15''' |
||
| Line 66: | Line 70: | ||
** [[Plasma relay]] room, Junction Room 16 ({{VOY|Good Shepherd}}) |
** [[Plasma relay]] room, Junction Room 16 ({{VOY|Good Shepherd}}) |
||
| − | ==Background== |
+ | == Background == |
| − | This is the layout of the {{USS|Voyager}} according to ''[[Star Trek Voyager Technical |
+ | This is the layout of the {{USS|Voyager}} according to ''[[Star Trek: Voyager Technical Manual]]'', an adaptation of the ''[[Star Trek: The Next Generation Technical Manual]], intended as a writers guide for [[VOY Season 1]]. |
{| class="grey" |
{| class="grey" |
||
|- |
|- |
||
| − | ! Deck<br># |
+ | ! Deck<br /># |
! Primary Hull |
! Primary Hull |
||
| − | ! Deck<br># |
+ | ! Deck<br /># |
! Engineering Hull |
! Engineering Hull |
||
|- |
|- |
||
| Line 140: | Line 144: | ||
| |
| |
||
| 13 |
| 13 |
||
| − | | Aft Tractor Beam Emitter, Warp Engine Core, Reserve Warp Engine Core, Quarters, Labs, Escape pod Access, Secondary [[ODN]]/[[EPS]] Trunks |
+ | | Aft Tractor Beam Emitter, Warp Engine Core, Reserve Warp Engine Core, Quarters, Labs, Escape pod Access, Secondary [[Optical data network|ODN]]/[[EPS]] Trunks |
|- |
|- |
||
| |
| |
||
| Line 153: | Line 157: | ||
|- |
|- |
||
|} |
|} |
||
| − | [[Category:Starship sections]] |
+ | [[Category:Starship sections| ]] |
Revision as of 17:20, 27 June 2015
The decks of an Intrepid-class Federation starship:
- Deck 1
- Bridge (VOY: "Caretaker" et al.)
- on the starboard side (VOY: "Good Shepherd"): Captain's ready room (VOY: "Caretaker" et al.)
- Briefing room (VOY: "Parallax")
- Deck 2
- Captain's Private Dining Room, cabin 125 Alpha; Section 13 (VOY: "Phage", "Macrocosm")
- Mess hall (VOY: "Learning Curve")
- Captain's Private Dining Room, cabin 125 Alpha; Section 13 (VOY: "Phage", "Macrocosm")
- Deck 3
- Officers' and VIP Quarters
- Deck 4
- Transporter rooms 1 and 2 (VOY: "Phage")
- Energy grid, location of bio-neural gel pack; section 9C (VOY: "Learning Curve")
- Cargo bay 2 (VOY: "Maneuvers")
- Crew quarters (VOY: "Twisted")
Schematic of Deck 5, Section 15 Alpha
- Deck 6
- Holodeck Two (VOY: "Twisted")
- Energy Grid Beta four - location of bio-neural gel pack (VOY: "Learning Curve")
- Armory
- Crew quarters (VOY: "Twisted")
- Deck 7
- Deck 8
- Deck 9
- Crew quarters: Section 12 (VOY: "Someone to Watch Over Me"), Section 22 (VOY: "Equinox") and
- Section 23 (VOY: "Infinite Regress")
- Deck 10
- Shuttlebay; Junction 32-Alpha (VOY: "The Raven", "Macrocosm", "Alice")

Engineering section cutaway
- Deck 11
- Airponics bay; (VOY: "Fury")
- Main Engineering, Section 4-B, starboard side and Section 32 (VOY: "Twisted", "Persistence of Vision", "Drone")
- Deck 12
- Navigational control; Section B-7 (VOY: "Cathexis")
- Environmental control (VOY: "Macrocosm")
- Deck 13
- Located 10 meters below Engineering (VOY: "Emanations")
- Deck 15
- Jefferies tube G-33; uninhabited (VOY: "The Disease")
- Jefferies tube 12; section 29-alpha (VOY: "Deadlock")
- Plasma relay room, Junction Room 16 (VOY: "Good Shepherd")
Background
This is the layout of the USS Voyager according to Star Trek: Voyager Technical Manual, an adaptation of the Star Trek: The Next Generation Technical Manual, intended as a writers guide for VOY Season 1.
| Deck # |
Primary Hull | Deck # |
Engineering Hull |
|---|---|---|---|
| 1 | Bridge, Ready Room, Conference room, Escape pod access, Aft bridge airlock, Upper sensor platform | ||
| 2 | Officers' mess, Officers' & VIP Quarters, Labs & Storage, Sensor gear, Escape pod access | ||
| 3 | Captain's quarters, Officers' & VIP Quarters, Photon torpedo trackers | ||
| 4 | Aft Torpedo launchers, Transporter rooms 1 and 2, Phaser Maintenance, Sensor Gear, Escape pod Access | ||
| 5 | Sickbay, Doctor's Office, Sensor Gear, Escape pod Access | ||
| 6 | Aux. Deflector, Aux. Computer core, Escape pod access | 6 | Deuterium (Matter) Processing, Consumables Resupply Connectors |
| 7 | Aux. Computer Core, Upper Cargo bays 1-2, Labs, Escape pod Access, RCS thruster Access | 7 | Deuterium Tankage, Warp Engine Core Injector Access |
| 8 | Deuterium Processing, Port/Starboard/Forward Docking Ports, ODN/EPS Main Trunks, Lower Cargo Bays 1-2 | 8 | Deuterium Tankage, Warp Engine Core, Aft Work Pod Storage |
| 9 | Cargo Loading Doors, AeroWing Shuttle Dock, Labs | 9 | Upper Main Shuttlebay, Warp Engine Core |
| 10 | Main Shuttlebay, Main Computer Core, Warp Engine Core, Forward Photon Torpedo Launchers, Reserve Warp Engine Core, Main Navigational deflector | ||
| 11 | "Wing" Level: Main Engineering, Engineer's Office, Warp Engine Core, Reserve Warp Engine Core, Main Computer core, Main Navigational deflector | ||
| 12 | Antimatter Tankage, Warp Engine Core, Main deflector, Reserve Warp Engine Core, Escape pod Access | ||
| 13 | Aft Tractor Beam Emitter, Warp Engine Core, Reserve Warp Engine Core, Quarters, Labs, Escape pod Access, Secondary ODN/EPS Trunks | ||
| 14 | Antimatter Processing, Reserve Warp Engine Core, Escape pod Access, Ground Hover Footpad Systems | ||
| 15 | Antimatter Loading Port, Forward Tractor Beam Emitter, Ground Hover Footpads |