m (r2.7.5) (Bot: Modifying ja:生き返った死の宇宙商人(エピソード)) |
m (→References) Tag: sourceedit |
||
| (22 intermediate revisions by 11 users not shown) | |||
| Line 31: | Line 31: | ||
|aPrevInUniverseTimeline = |
|aPrevInUniverseTimeline = |
||
}} |
}} |
||
| − | Geordi La Forge leads the ''Enterprise'' into battle while Captain Picard and an away team are trapped on planet Minos, taking fire from a dangerous automated weapons system. |
+ | Geordi La Forge leads the ''Enterprise''-D into battle while Captain Picard and an away team are trapped on planet Minos, taking fire from a dangerous automated weapons system. |
| + | |||
| − | ==Summary== |
+ | == Summary == |
| − | Arriving at [[Minos]] in the [[Lorenze Cluster]] to investigate the disappearance of the {{USS|Drake|2364}}, the {{USS|Enterprise|NCC-1701-D|-D}} enters [[orbit]]. |
+ | Arriving at [[Minos]] in the [[Lorenze Cluster]] to investigate the disappearance of the {{USS|Drake|2364}}, the {{USS|Enterprise|NCC-1701-D|-D}} enters [[orbit]]. Discovering no [[life sign]]s on the [[planet]]'s surface, they are surprised by a [[hail]] from a [[Unnamed holograms#Minosian Peddler|peddler]], which is actually an automated message from the time of the [[Ersalrope Wars]]. [[Commander]] [[William T. Riker|Riker]], [[Natasha Yar]] and [[Data]] [[transporter|transport]] down to the planet's surface to investigate. Yar finds a piece of melted [[tritanium]] and Data finds an undamaged high-tech mounted [[weapon]] in a ruined structure. Riker comments on the finds, and Yar mentions that whatever weapon melted the tritanium is beyond current [[Federation]] technology. |
[[File:Paul Rice.jpg|thumb|left|Captain Rice appears and asks Riker strange questions]] |
[[File:Paul Rice.jpg|thumb|left|Captain Rice appears and asks Riker strange questions]] |
||
| − | Suddenly, [[Captain]] [[Paul Rice]], the commanding officer of the USS ''Drake'', appears from behind the bushes and engages Riker in conversation. |
+ | Suddenly, [[Captain]] [[Paul Rice]], the commanding officer of the USS ''Drake'', appears from behind the bushes and engages Riker in conversation. Back on ''Enterprise''-D, they confirm that there are still no [[lifeform]]s other than the [[away team]], but there is an energy build-up close to the commander. Captain Rice asks Riker about the abilities of the ''Enterprise''-D, which raises suspicions in Riker's mind, and soon realizes that he's not speaking to the real Captain Rice. Rather than give away any information, Riker gives Rice false information about the {{USS|Lollipop}} rather than ''Enterprise''-D, calling it "''a good ship.''" Riker then reveals to the fake captain that he knows he's fake, and Rice is quickly replaced by a [[Echo Papa 607|weapon device]]. |
| − | Before the [[away team]] can respond, the weapon fires on Riker, encasing him in a bubble of [[energy]]. Yar quickly fires back, and destroys the weapon. |
+ | Before the [[away team]] can respond, the weapon fires on Riker, encasing him in a bubble of [[energy]]. Yar quickly fires back, and destroys the weapon. Data and Yar examine the bubble holding Riker in [[stasis]], and contact [[Captain]] [[Jean-Luc Picard|Picard]] to tell him that Riker has been trapped by a [[force field]]. Unable to transport Riker to the ship, the captain and [[Doctor]] [[Beverly Crusher|Crusher]] transport down to the planet's surface to help, leaving [[Geordi La Forge]] in charge on the [[bridge]]. |
[[File:Riker in stasis field.jpg|thumb|Trapped in stasis]] |
[[File:Riker in stasis field.jpg|thumb|Trapped in stasis]] |
||
| − | On the planet's surface, Picard and the others theorize about the reason why the weapon put Riker in stasis rather than kill him. |
+ | On the planet's surface, Picard and the others theorize about the reason why the weapon put Riker in stasis rather than kill him. Data is instructed to try and use his [[phaser]] to cut away the bubble, but just as he starts, the ''Enterprise''-D hails the away team, informing them that another energy reading has appeared, and that it is moving towards them. Yar takes up position next to Data, and the second weapon arrives, knocking Doctor Crusher over. The captain goes to help her, as the weapon begins firing. |
| − | Suddenly, the ground under the captain and the doctor gives way, and they both fall down into |
+ | Suddenly, the ground under the captain and the doctor gives way, and they both fall down into a deep underground cavern. Picard lands well and is unharmed, but the doctor is almost buried in loose sand and rocks. Meanwhile, Data and Yar battle with the second weapon, discovering that it has learned and adapted from its previous encounter, and is now evasive and much more difficult to destroy. However, the combined effort of the two is enough to destroy it. Finally noticing the disappearance of the captain and the doctor, Yar and Data try and contact them with their [[combadge]]s, but they're no longer functioning. Yar decides to go off and try and find them, leaving Data with the still immobile Riker. |
[[File:Picard and Crusher trapped underground.jpg|thumb|left|''"How bad is it?" "BAD."'']] |
[[File:Picard and Crusher trapped underground.jpg|thumb|left|''"How bad is it?" "BAD."'']] |
||
| − | Back in the cavern, Crusher is nearly unconscious, with a broken arm and heavy bleeding. |
+ | Back in the cavern, Crusher is nearly unconscious, with a broken arm and heavy bleeding. Picard also discovers that their communicators are malfunctioning. Yar returns to Data, after failing to find the captain, and discovers that Data has figured out the precise setting to use to dissolve the bubble around Riker. He fires his phaser, and Riker is released, disoriented, but unharmed. |
| − | Back on ''Enterprise'', La Forge receives a report that they can now beam up the entire away team, but suddenly the [[deflector shield]]s raise automatically, as one of the weapons starts firing at the ship from almost point-blank range. |
+ | Back on the ''Enterprise''-D, La Forge receives a report that they can now beam up the entire away team, but suddenly the [[deflector shield]]s raise automatically, as one of the weapons starts firing at the ship from almost point-blank range. The blast rocks the ship, but the shields hold. Just before their weapons can target the device and destroy it, it vanishes from the [[sensor]]s, appearing moments later behind the ship, and firing again. Realizing that the ship won't be able to stand up to this much punishment indefinitely, and that the away team can't be beamed up with the shields up, La Forge is left to ponder his options. |
[[File:Logan.jpg|thumb|Not a courtesy call]] |
[[File:Logan.jpg|thumb|Not a courtesy call]] |
||
| − | [[Chief Engineer]] [[Logan]] arrives on the bridge, and, hearing La Forge's plan of staying in orbit to try and rescue the away team, he demands that La Forge relinquish his command to him, a higher-ranking officer. |
+ | [[Chief Engineer]] [[Logan]] arrives on the bridge, and, hearing La Forge's plan of staying in orbit to try and rescue the away team, he demands that La Forge relinquish his command to him, a higher-ranking officer. However, La Forge is more interested in trying to destroy the weapon, so he ignores Logan, and tells [[Worf]] to compute the predicted attack path of the weapon, firing in the dark. Logan continues to interfere, and La Forge sends him back to [[engineering]], saying he's in command until relieved by either Commander Riker or Captain Picard. |
| − | Back on the planet, a third weapon has been released, and this time it is equipped with its own deflector shield. |
+ | Back on the planet, a third weapon has been released, and this time it is equipped with its own deflector shield. Data comments that the weapon continues to upgrade itself after every encounter. But, still, now with the combined fire-power of three phasers, they just about manage to destroy the weapon. Data tells Riker that the weapons appear every twelve minutes, which gives them all the incentive they need to be off the planet by that time. |
| − | In the cavern, Picard continues to make sure Crusher doesn't fall unconscious. |
+ | In the cavern, Picard continues to make sure Crusher doesn't fall unconscious. He discovers that she's got another, more serious, wound on her leg, which is bleeding heavily. The captain manages to stop the bleeding, and although Crusher is still in shock, he tries to do his best for her. |
[[File:Simultaneous phasers and photon torpedoes.jpg|thumb|left|Firing all weapons]] |
[[File:Simultaneous phasers and photon torpedoes.jpg|thumb|left|Firing all weapons]] |
||
| − | Back on the ship, La Forge and the bridge crew are just about ready for their first test shot. |
+ | Back on the ship, La Forge and the bridge crew are just about ready for their first test shot. The ''Enterprise''-D's phasers and [[photon torpedo]]es are fired simultaneously, but they miss totally. This is reinforced by the weapon firing on the shields once again. As La Forge sits back in his chair, disappointed, the weapon fires again, further damaging the shields. Everyone on the bridge is now looking to him for orders, as the weapon fires once more. La Forge then calls for Logan to come to the bridge. As soon as he arrives, La Forge calls for the ''Enterprise''-D to go to [[warp]] and leave the orbit of the planet, surprising everyone on the bridge. |
| − | La Forge then orders Lieutenant Logan to take command of the [[saucer section]] of the ''Enterprise'', ensuring the safety of the majority of the crew, while La Forge takes the [[stardrive]] section back to the planet. When La Forge and the bridge crew have relocated to the [[battle bridge]], the ship [[Saucer separation|separates]], leaving the saucer section behind. |
+ | La Forge then orders Lieutenant Logan to take command of the [[saucer section]] of the ''Enterprise''-D, ensuring the safety of the majority of the crew by taking it to [[Starbase 103]], while La Forge takes the [[stardrive]] section back to the planet. La Forge retreats to Picard's ready room to ponder his strategy. [[Counselor]] [[Deanna Troi|Troi]] enters and gives him some advice on how to properly command the two young junior officers [[Orfil Solis|Solis]] and [[Lian T'Su|T'Su]], telling him that it is ''he'' they will draw strength from. She advises him to show confidence in them, just as Captain Picard showed confidence in La Forge when he left him in command of the ''Enterprise''-D. La Forge gratefully accepts Troi's advice. When La Forge and the bridge crew have relocated to the [[battle bridge]], the ship [[Saucer separation|separates]], leaving the saucer section behind. |
[[File:Yar and Data fire phasers.jpg|thumb|Yar and Data fight the drone]] |
[[File:Yar and Data fire phasers.jpg|thumb|Yar and Data fight the drone]] |
||
| − | Meanwhile back in the cavern, Picard uncovers an [[alien]] viewscreen. |
+ | Meanwhile back in the cavern, Picard uncovers an [[alien]] viewscreen. A [[hologram|holographic]] projection of the same salesman as they'd seen before appears and begins extolling the virtues of the "[[Echo Papa 607]]," the Minosians' ultimate achievement. Picard is shocked to be told that the attacks on the away team and the ''Enterprise''-D have simply been part of an automated "demonstration" of the weapon. Picard tells the salesman to abort the demonstration, but the salesman says they have to see what the weapon can do. Beverly volunteers that the salesman program doesn't understand anything other than what it's been programmed to sell - it has no idea that its parent civilization was wiped out. |
| − | The salesman continues to explain the weapon: after each encounter with the enemy, the central unit learns and adapts its weapons to combat them. |
+ | The salesman continues to explain the weapon: after each encounter with the enemy, the central unit learns and adapts its weapons to combat them. Once it is activated, the Echo Papa 607 is unstoppable. The captain realizes that this is all too true: it was the Minosians' own weapon system that destroyed their civilization. The unit then signals that the final weapon device is about to be launched. |
| ⚫ | |||
| ⚫ | Commander Riker and the others locate the hole the captain and the doctor fell through, but there is no way for them to reach each other. Then Data states that he can safely jump down the 11.75 [[meter]] drop without damage. This surprises everyone, but without hesitation, the [[android]] officer jumps down the hole, and easily survives the impact. Riker and Yar take up defensive positions in an attempt to prepare for the final weapon. |
||
| ⚫ | |||
| ⚫ | Commander Riker and the others locate the hole the captain and the doctor fell through, but there is no way for them to reach each other. |
||
| ⚫ | As the stardrive section of the ''Enterprise''-D returns to Minos, La Forge tries to give the two young officers (Solis and T'Su) some encouragement just as Troi suggested. Back in the cavern, the final weapon is launched, and Data attempts to reprogram the targeting settings. Finding no alternate targets for the weapon to lock onto, however, Data draws a blank. Crusher suggests that they simply turn the machine off. The idea is so simple, Picard hadn't even considered it. He demands to the peddler to turn off the machine. Again, the peddler seems not to understand, insisting that they have to see everything the machine can do. Picard says they've seen enough, and quickly agrees to "buy" the weapon system. Satisfied, the peddler congratulates Picard on his decision, and disappears. The effect is instant – the display screen goes blank, the final weapon deactivates, and the dampening field blocking communications is released. |
||
| ⚫ | However, things are not so good on ''Enterprise''-D. The weapon system is still functional in orbit of the planet, and is chasing the ship. La Forge orders the ship into the planet's [[atmosphere]], where the atmospheric interaction with the weapon's cloak will reveal its presence. As the ''Enterprise''-D descends, the shields begin to fail, but, just in time, T'Su detects a disturbance to starboard. Worf instantly locks phasers on the weapon and destroys it easily. Celebrating their victory, the bridge crew quickly returns the ''Enterprise''-D to standard orbit and T'Su reports the away team being transported aboard. |
||
| ⚫ | |||
| ⚫ | As the |
||
| ⚫ | When Captain Picard and Riker arrive on the battle bridge La Forge rises from the captain's chair to relinquish command but Picard refuses. At first La Forge doesn't understand but Picard tells La Forge that when he left, the ''Enterprise''-D was still in one piece and that he would appreciate it being returned to him in that same condition. So La Forge, delighted that he will remain in command for a bit longer, orders Solis to lay in a course for a rendezvous with the saucer section while Picard and Riker look on and T'Su reports that sickbay says Dr. Crusher will be fine. |
||
| ⚫ | However, things are not so good on ''Enterprise''. |
||
| ⚫ | |||
| ⚫ | |||
| ⚫ | |||
| ⚫ | When Captain Picard and Riker arrive on the battle bridge La Forge rises from the captain's chair to relinquish command but Picard refuses. |
||
| ⚫ | |||
| − | {{clear}} |
||
| − | ==Memorable quotes== |
+ | == Memorable quotes == |
"''What happened to all the people?''"<br /> |
"''What happened to all the people?''"<br /> |
||
"''War?''"<br /> |
"''War?''"<br /> |
||
| Line 126: | Line 129: | ||
"''You haven't used my first name once, Paul. You remember it, don't you?''" |
"''You haven't used my first name once, Paul. You remember it, don't you?''" |
||
: - '''Rice's hologram''' and '''Riker''', who is becoming suspicious |
: - '''Rice's hologram''' and '''Riker''', who is becoming suspicious |
||
| + | |||
| + | |||
| + | "''You can't fight what you can't see.''" |
||
| + | : - '''Logan''' to '''Geordi La Forge''' |
||
| Line 167: | Line 174: | ||
* The big emotional scene, with Picard and Crusher trapped in a cavern, was conveniently interrupted by a handy plot development before it could go beyond anything but the vaguest of hints. Originally, Crusher was going to reveal her true feelings to the gravely wounded Picard, but matters were switched so that Crusher was the injured party. |
* The big emotional scene, with Picard and Crusher trapped in a cavern, was conveniently interrupted by a handy plot development before it could go beyond anything but the vaguest of hints. Originally, Crusher was going to reveal her true feelings to the gravely wounded Picard, but matters were switched so that Crusher was the injured party. |
||
* This change worked, but the failure of the scene to make its intended point was frustrating not only to Lewin but to director [[Les Landau]] and to most viewers. The scene was further marred by a fact not readily discernible to viewers watching at home; it seems that the sand in the cavern was infested with fleas, which made the shoot an utterly miserable experience for Patrick Stewart and Gates McFadden, who were under constant attack by the minute bloodthirsty creatures. (''[[Star Trek: The Next Generation Companion]]''; ''[[Captains' Logs: The Unauthorized Complete Trek Voyages]]''; ''[[Trek: The Unauthorized Behind-The-Scenes Story of The Next Generation]]'') |
* This change worked, but the failure of the scene to make its intended point was frustrating not only to Lewin but to director [[Les Landau]] and to most viewers. The scene was further marred by a fact not readily discernible to viewers watching at home; it seems that the sand in the cavern was infested with fleas, which made the shoot an utterly miserable experience for Patrick Stewart and Gates McFadden, who were under constant attack by the minute bloodthirsty creatures. (''[[Star Trek: The Next Generation Companion]]''; ''[[Captains' Logs: The Unauthorized Complete Trek Voyages]]''; ''[[Trek: The Unauthorized Behind-The-Scenes Story of The Next Generation]]'') |
||
| − | * The closed captioning for this episode replaces the term " |
+ | * The closed captioning for this episode replaces the term "Ersalrope wars" with "Romulan wars." |
| − | |||
=== Production === |
=== Production === |
||
| + | [[File:Echo papa 607 model.jpg|thumb|Dan Curry's son holding the original Echo Papa 607]] |
||
* Director [[Les Landau]] whose first assignment as director was this episode, remembered, "''...the episode..., was in creative turmoil and going through a massive, last-minute rewrite. In five years, that was the ''only'' time the company had to shut down because there was no shooting script to be shot. I was familiar with the sets, cast and crew, so although the script was late in appearing, I had all the knowledge and background to go ahead and do my job. To this day, 'Arsenal' still stands out as one of the better shows, certainly one of the shows with the most production value of any we've ever done. Fortunately, all the elements fell together on that first day. I had the total support of the cast, crew and company to go ahead and do the best job possible. The cast was, and has always been, totally supportive of working with and for me, and I can't say enough about their cooperation.''" (''[[The Official Star Trek: The Next Generation Magazine]]'' Vol. 21, p. 41) |
* Director [[Les Landau]] whose first assignment as director was this episode, remembered, "''...the episode..., was in creative turmoil and going through a massive, last-minute rewrite. In five years, that was the ''only'' time the company had to shut down because there was no shooting script to be shot. I was familiar with the sets, cast and crew, so although the script was late in appearing, I had all the knowledge and background to go ahead and do my job. To this day, 'Arsenal' still stands out as one of the better shows, certainly one of the shows with the most production value of any we've ever done. Fortunately, all the elements fell together on that first day. I had the total support of the cast, crew and company to go ahead and do the best job possible. The cast was, and has always been, totally supportive of working with and for me, and I can't say enough about their cooperation.''" (''[[The Official Star Trek: The Next Generation Magazine]]'' Vol. 21, p. 41) |
||
=== Continuity === |
=== Continuity === |
||
| − | [[File: |
+ | [[File:Minosian weapon.jpg|thumb|The prop Minosian weapon, later re-used in ''Enterprise'']] |
| − | * This episode marks the third appearance of one of the ''Enterprise''-D's chief engineers, after [[Sarah MacDougal]] ({{TNG|The Naked Now}}) and [[Argyle]] ({{TNG|Where No One Has Gone Before|Datalore}}). In this case, it is [[ |
+ | * This episode marks the third appearance of one of the ''Enterprise''-D's chief engineers, after [[Sarah MacDougal]] ({{TNG|The Naked Now}}) and [[Argyle]] ({{TNG|Where No One Has Gone Before|Datalore}}). In this case, it is [[Logan]]. |
* The saucer separation was created completely by using stock footage from {{e|Encounter at Farpoint}}. |
* The saucer separation was created completely by using stock footage from {{e|Encounter at Farpoint}}. |
||
* Footage of [[Jonathan Frakes]] ([[William T. Riker]]) from the scene with Rice was later used in the series finale {{e|All Good Things...}} so he could appear younger and beardless. |
* Footage of [[Jonathan Frakes]] ([[William T. Riker]]) from the scene with Rice was later used in the series finale {{e|All Good Things...}} so he could appear younger and beardless. |
||
| − | * This is the last episode in Season |
+ | * This is the last episode in Season One to have ''red alert'' sounded and is also the last appearance of the old style red alert flashing lights. The old style red alert lights only flash on and off at the top and bottom, however, the next episode to have red alert sounded which will be {{e|Where Silence Has Lease}} will feature the regular lights that entirely flash on and off and will be used for the rest of the show's run. |
* An [[Echo Papa 607]] drone, holographically masquerading as [[Paul Rice]], stated the {{USS|Drake|2364}} had a maximum speed of Warp 3, which would make it the slowest known starship in Starfleet in the 24th century. |
* An [[Echo Papa 607]] drone, holographically masquerading as [[Paul Rice]], stated the {{USS|Drake|2364}} had a maximum speed of Warp 3, which would make it the slowest known starship in Starfleet in the 24th century. |
||
* After {{e|Angel One}}, this is the second and final episode to show La Forge in command. |
* After {{e|Angel One}}, this is the second and final episode to show La Forge in command. |
||
| + | * This is the first episode of the series to show [[Worf]] at the ''Enterprise''-D's [[tactical station]], a position he would be officially stationed at starting with {{e|Skin of Evil}} and would remain there for the rest of the series and {{film|7}}. |
||
=== Sets, props and costumes === |
=== Sets, props and costumes === |
||
| − | * The miniature of the [[Echo Papa 607]] was built by visual effects supervisor [[Dan Curry]], using an old L'Eggs pantyhose container and a discarded shampoo bottle. (''[[Star Trek Encyclopedia]]'', |
+ | * The miniature of the [[Echo Papa 607]] was built by visual effects supervisor [[Dan Curry]], using an old L'Eggs pantyhose container and a discarded shampoo bottle. (''[[Star Trek Encyclopedia]]'', [[TNG Season 1 DVD]] special feature "Memorable Missions") |
| ⚫ | * The prop for the big surface [[cannon]] that had been used to melt [[tritanium]], speculated by Riker for being a demonstration model for a potential buyer, was [http://www.modernprops.com/Details1b.asp?dept=195&category=760&item=1 a prop] rented from [http://www.modernprops.com Modern Props]. It was [[:File:Orpheuslasercannon.jpg|later on seen again]] in {{ENT|Demons}} as a [[22nd century]] mining laser used on [[Luna]]. |
||
| − | |||
| ⚫ | * The prop for the big surface [[cannon]] that had been used to melt [[tritanium]], speculated by Riker for being a demonstration model for a potential buyer, was [ |
||
=== Cast and characters === |
=== Cast and characters === |
||
| Line 221: | Line 228: | ||
=== Uncredited co-stars === |
=== Uncredited co-stars === |
||
* [[James G. Becker]] as [[Youngblood]] |
* [[James G. Becker]] as [[Youngblood]] |
||
| − | * [[David Eum]] as |
+ | * [[David Eum]] as {{dis|Wright|Ensign}} |
* [[Unknown performers]] as |
* [[Unknown performers]] as |
||
** [[Unnamed USS Enterprise (NCC-1701-D) command division personnel#Command division bridge officer (2364)|Command division officer]] |
** [[Unnamed USS Enterprise (NCC-1701-D) command division personnel#Command division bridge officer (2364)|Command division officer]] |
||
| Line 245: | Line 252: | ||
=== References === |
=== References === |
||
| − | [[Advanced |
+ | [[Advanced Navigation]]; [[aquarium]]; [[arms dealer]]; [[Arvada III]]; [[away team]]; [[battle bridge]]; [[blood]]; [[bridge]]; [[cannon]]; [[clotting agent]]; [[desktop monitor]]; [[docking latch]]; [[USS Drake (2364)|''Drake'', USS]]; [[Echo Papa 607]]; [[emergency power]]; [[Ersalrope Wars]]; [[extinction]]; [[fish]]; [[fog]]; [[force field]]; {{class|Galaxy}}; [[Galaxy class decks]]; [[heat shield]]; [[hologram]]; [[Felisa Howard|Howard, Felisa]]; [[Isabel Howard|Howard, Isabel]]; [[Paul Howard|Howard, Paul]]; [[light cruiser]]; [[Livingston]]; [[USS Lollipop|''Lollipop'', USS]]; [[Lorenze Cluster]]; [[medical tricorder]]; [[meter]]; [[Minos]]; [[Minosian]]; [[number one]]; [[orbit]]; [[PADD]]; [[phaser]]; [[photon torpedo]]; [[planet]]; [[planetary defense system]]; [[ready room]]; [[ring]]; [[root]]; [[saucer module]]; [[saucer separation]]; [[sculpture]]; [[shock]]; [[skant]]; [[Starbase 103]]; [[stardrive section]]; [[Starfleet Academy]]; [[stasis]]; [[stasis field]]; ''[[The Annotated Shakespeare]]''; [[transporter room]]; [[tricorder]]; [[tritanium]]; [[type 2 phaser]]; [[unnamed plants#Minos wildlife|unnamed plants]]; [[viewscreen]]; [[VISOR]]; [[warp factor|warp 3]]; [[weapon]]; [[wood]] |
| − | |||
| ⚫ | |||
| ⚫ | |||
| ⚫ | |||
=== External links === |
=== External links === |
||
| − | * {{ |
+ | * {{Startrek.com|arsenal-of-freedom-the|"The Arsenal of Freedom"}} |
| − | * {{ |
+ | * {{mbeta-quote|The Arsenal of Freedom}} |
| − | *{{ |
+ | * {{wikipedia-quote|The Arsenal of Freedom}} |
| + | * {{IMDb-link|type=title|page=tt0708783|name="The Arsenal of Freedom"}} |
||
| + | * {{ml|the-arsenal-of-freedom|"The Arsenal of Freedom"|external}} |
||
{{TNG nav|season=1|last={{e|Heart of Glory}}|next={{e|Symbiosis}}}} |
{{TNG nav|season=1|last={{e|Heart of Glory}}|next={{e|Symbiosis}}}} |
||
| − | |||
| ⚫ | |||
[[cs:The Arsenal of Freedom]] |
[[cs:The Arsenal of Freedom]] |
||
| Line 266: | Line 269: | ||
[[ja:生き返った死の宇宙商人(エピソード)]] |
[[ja:生き返った死の宇宙商人(エピソード)]] |
||
[[nl:The Arsenal of Freedom]] |
[[nl:The Arsenal of Freedom]] |
||
| ⚫ | |||
Revision as of 09:31, 30 August 2015
Template:Realworld Geordi La Forge leads the Enterprise-D into battle while Captain Picard and an away team are trapped on planet Minos, taking fire from a dangerous automated weapons system.
Summary
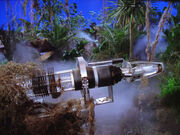
Arriving at Minos in the Lorenze Cluster to investigate the disappearance of the USS Drake, the USS Enterprise-D enters orbit. Discovering no life signs on the planet's surface, they are surprised by a hail from a peddler, which is actually an automated message from the time of the Ersalrope Wars. Commander Riker, Natasha Yar and Data transport down to the planet's surface to investigate. Yar finds a piece of melted tritanium and Data finds an undamaged high-tech mounted weapon in a ruined structure. Riker comments on the finds, and Yar mentions that whatever weapon melted the tritanium is beyond current Federation technology.
Captain Rice appears and asks Riker strange questions
Suddenly, Captain Paul Rice, the commanding officer of the USS Drake, appears from behind the bushes and engages Riker in conversation. Back on Enterprise-D, they confirm that there are still no lifeforms other than the away team, but there is an energy build-up close to the commander. Captain Rice asks Riker about the abilities of the Enterprise-D, which raises suspicions in Riker's mind, and soon realizes that he's not speaking to the real Captain Rice. Rather than give away any information, Riker gives Rice false information about the USS Lollipop rather than Enterprise-D, calling it "a good ship." Riker then reveals to the fake captain that he knows he's fake, and Rice is quickly replaced by a weapon device.
Before the away team can respond, the weapon fires on Riker, encasing him in a bubble of energy. Yar quickly fires back, and destroys the weapon. Data and Yar examine the bubble holding Riker in stasis, and contact Captain Picard to tell him that Riker has been trapped by a force field. Unable to transport Riker to the ship, the captain and Doctor Crusher transport down to the planet's surface to help, leaving Geordi La Forge in charge on the bridge.
Trapped in stasis
On the planet's surface, Picard and the others theorize about the reason why the weapon put Riker in stasis rather than kill him. Data is instructed to try and use his phaser to cut away the bubble, but just as he starts, the Enterprise-D hails the away team, informing them that another energy reading has appeared, and that it is moving towards them. Yar takes up position next to Data, and the second weapon arrives, knocking Doctor Crusher over. The captain goes to help her, as the weapon begins firing.
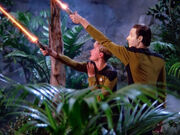
Suddenly, the ground under the captain and the doctor gives way, and they both fall down into a deep underground cavern. Picard lands well and is unharmed, but the doctor is almost buried in loose sand and rocks. Meanwhile, Data and Yar battle with the second weapon, discovering that it has learned and adapted from its previous encounter, and is now evasive and much more difficult to destroy. However, the combined effort of the two is enough to destroy it. Finally noticing the disappearance of the captain and the doctor, Yar and Data try and contact them with their combadges, but they're no longer functioning. Yar decides to go off and try and find them, leaving Data with the still immobile Riker.
"How bad is it?" "BAD."
Back in the cavern, Crusher is nearly unconscious, with a broken arm and heavy bleeding. Picard also discovers that their communicators are malfunctioning. Yar returns to Data, after failing to find the captain, and discovers that Data has figured out the precise setting to use to dissolve the bubble around Riker. He fires his phaser, and Riker is released, disoriented, but unharmed.
Back on the Enterprise-D, La Forge receives a report that they can now beam up the entire away team, but suddenly the deflector shields raise automatically, as one of the weapons starts firing at the ship from almost point-blank range. The blast rocks the ship, but the shields hold. Just before their weapons can target the device and destroy it, it vanishes from the sensors, appearing moments later behind the ship, and firing again. Realizing that the ship won't be able to stand up to this much punishment indefinitely, and that the away team can't be beamed up with the shields up, La Forge is left to ponder his options.


Not a courtesy call
Chief Engineer Logan arrives on the bridge, and, hearing La Forge's plan of staying in orbit to try and rescue the away team, he demands that La Forge relinquish his command to him, a higher-ranking officer. However, La Forge is more interested in trying to destroy the weapon, so he ignores Logan, and tells Worf to compute the predicted attack path of the weapon, firing in the dark. Logan continues to interfere, and La Forge sends him back to engineering, saying he's in command until relieved by either Commander Riker or Captain Picard.
Back on the planet, a third weapon has been released, and this time it is equipped with its own deflector shield. Data comments that the weapon continues to upgrade itself after every encounter. But, still, now with the combined fire-power of three phasers, they just about manage to destroy the weapon. Data tells Riker that the weapons appear every twelve minutes, which gives them all the incentive they need to be off the planet by that time.
In the cavern, Picard continues to make sure Crusher doesn't fall unconscious. He discovers that she's got another, more serious, wound on her leg, which is bleeding heavily. The captain manages to stop the bleeding, and although Crusher is still in shock, he tries to do his best for her.

Firing all weapons
Back on the ship, La Forge and the bridge crew are just about ready for their first test shot. The Enterprise-D's phasers and photon torpedoes are fired simultaneously, but they miss totally. This is reinforced by the weapon firing on the shields once again. As La Forge sits back in his chair, disappointed, the weapon fires again, further damaging the shields. Everyone on the bridge is now looking to him for orders, as the weapon fires once more. La Forge then calls for Logan to come to the bridge. As soon as he arrives, La Forge calls for the Enterprise-D to go to warp and leave the orbit of the planet, surprising everyone on the bridge.
La Forge then orders Lieutenant Logan to take command of the saucer section of the Enterprise-D, ensuring the safety of the majority of the crew by taking it to Starbase 103, while La Forge takes the stardrive section back to the planet. La Forge retreats to Picard's ready room to ponder his strategy. Counselor Troi enters and gives him some advice on how to properly command the two young junior officers Solis and T'Su, telling him that it is he they will draw strength from. She advises him to show confidence in them, just as Captain Picard showed confidence in La Forge when he left him in command of the Enterprise-D. La Forge gratefully accepts Troi's advice. When La Forge and the bridge crew have relocated to the battle bridge, the ship separates, leaving the saucer section behind.

Yar and Data fight the drone
Meanwhile back in the cavern, Picard uncovers an alien viewscreen. A holographic projection of the same salesman as they'd seen before appears and begins extolling the virtues of the "Echo Papa 607," the Minosians' ultimate achievement. Picard is shocked to be told that the attacks on the away team and the Enterprise-D have simply been part of an automated "demonstration" of the weapon. Picard tells the salesman to abort the demonstration, but the salesman says they have to see what the weapon can do. Beverly volunteers that the salesman program doesn't understand anything other than what it's been programmed to sell - it has no idea that its parent civilization was wiped out.
The salesman continues to explain the weapon: after each encounter with the enemy, the central unit learns and adapts its weapons to combat them. Once it is activated, the Echo Papa 607 is unstoppable. The captain realizes that this is all too true: it was the Minosians' own weapon system that destroyed their civilization. The unit then signals that the final weapon device is about to be launched.


"Does that mean you're going to buy?!"
Commander Riker and the others locate the hole the captain and the doctor fell through, but there is no way for them to reach each other. Then Data states that he can safely jump down the 11.75 meter drop without damage. This surprises everyone, but without hesitation, the android officer jumps down the hole, and easily survives the impact. Riker and Yar take up defensive positions in an attempt to prepare for the final weapon.
"We're a little busy up here, Captain!"
As the stardrive section of the Enterprise-D returns to Minos, La Forge tries to give the two young officers (Solis and T'Su) some encouragement just as Troi suggested. Back in the cavern, the final weapon is launched, and Data attempts to reprogram the targeting settings. Finding no alternate targets for the weapon to lock onto, however, Data draws a blank. Crusher suggests that they simply turn the machine off. The idea is so simple, Picard hadn't even considered it. He demands to the peddler to turn off the machine. Again, the peddler seems not to understand, insisting that they have to see everything the machine can do. Picard says they've seen enough, and quickly agrees to "buy" the weapon system. Satisfied, the peddler congratulates Picard on his decision, and disappears. The effect is instant – the display screen goes blank, the final weapon deactivates, and the dampening field blocking communications is released.
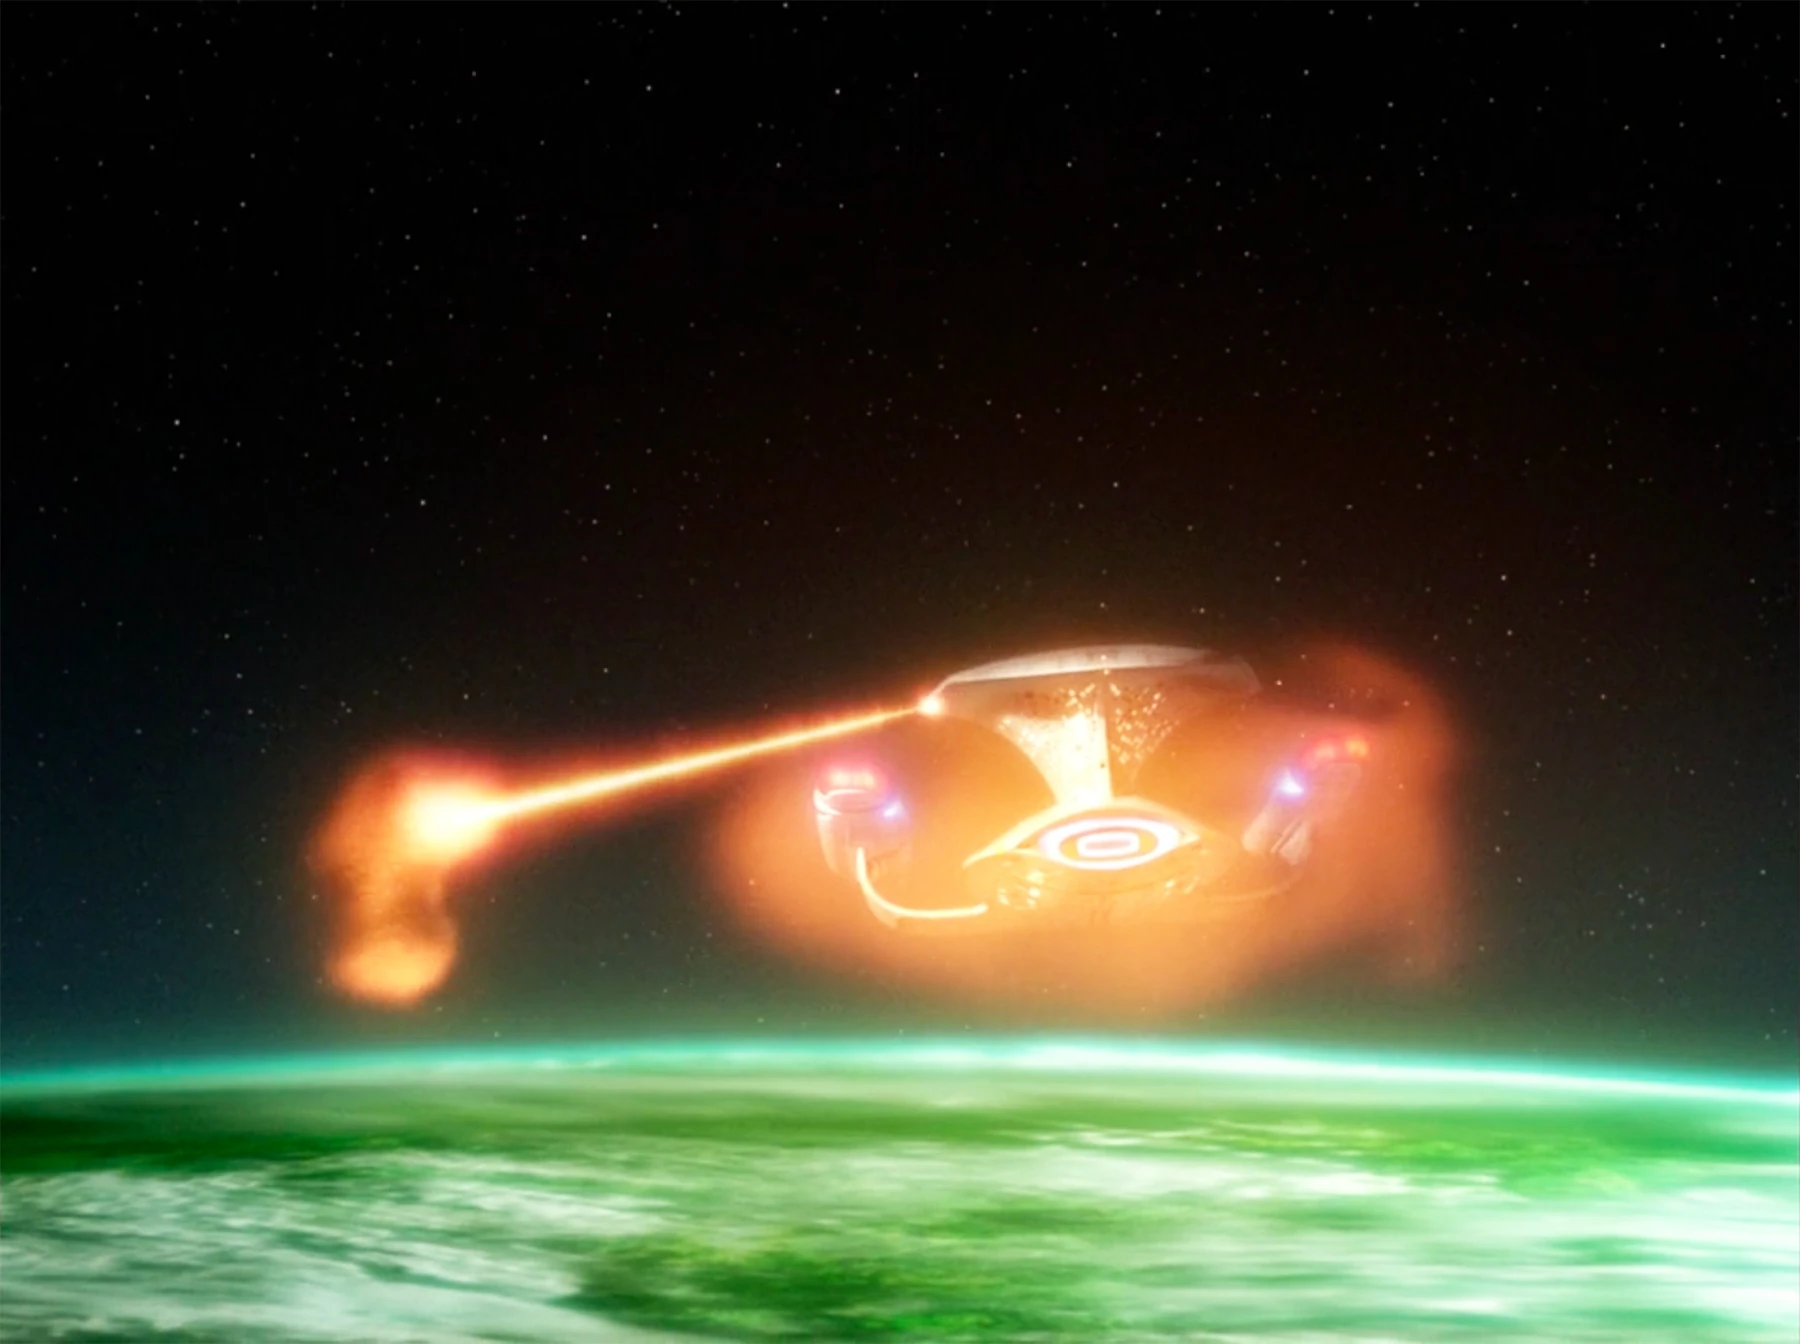
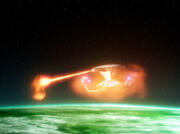
However, things are not so good on Enterprise-D. The weapon system is still functional in orbit of the planet, and is chasing the ship. La Forge orders the ship into the planet's atmosphere, where the atmospheric interaction with the weapon's cloak will reveal its presence. As the Enterprise-D descends, the shields begin to fail, but, just in time, T'Su detects a disturbance to starboard. Worf instantly locks phasers on the weapon and destroys it easily. Celebrating their victory, the bridge crew quickly returns the Enterprise-D to standard orbit and T'Su reports the away team being transported aboard.
When Captain Picard and Riker arrive on the battle bridge La Forge rises from the captain's chair to relinquish command but Picard refuses. At first La Forge doesn't understand but Picard tells La Forge that when he left, the Enterprise-D was still in one piece and that he would appreciate it being returned to him in that same condition. So La Forge, delighted that he will remain in command for a bit longer, orders Solis to lay in a course for a rendezvous with the saucer section while Picard and Riker look on and T'Su reports that sickbay says Dr. Crusher will be fine.
Log Entries
Memorable quotes
"What happened to all the people?"
"War?"
"Disease?"
"A dissatisfied customer?"
- - Deanna Troi, Worf, Data, and Geordi La Forge
"Captain, we are being hailed."
"How can that be, from a planet with no people?"
- - Data and Riker
"If you need a little something 'special', be it for one target, or multiple targets, we got it, you'll see it, here on Minos, where we live by the motto, 'Peace through superior firepower'."
- - The Peddler, in the automated message played to the Enterprise
"Minos, the arsenal of freedom. Perfection in highly advanced weaponry. Versatility, flexibility, and everything one hundred percent guaranteed! So, lock onto my signal and beam on down! Because we don't just provide weapons, we provide complete weapons sys-"
- - The Peddler
"That's a heck of a sales pitch."
- - Geordi La Forge, on the Peddler
"Who sent you here to look for me?"
"Your mother. She's worried about you."
- - Rice's hologram and Riker
"Spooky."
- - Riker, upon beaming down to Minos
"Tell me about your ship, Riker. It's the Enterprise, isn't it?"
"No... the name of my ship is the... Lollipop."
"I have no knowledge of that ship."
"It's just been commissioned. It's a good ship."
- - Rice's hologram and Riker
"What's the armament on your ship?"
"Ten."
"Ten? I don't understand, ten what?"
"Six."
"Commander Riker, your answers make no sense."
"You haven't used my first name once, Paul. You remember it, don't you?"
- - Rice's hologram and Riker, who is becoming suspicious
"You can't fight what you can't see."
- - Logan to Geordi La Forge
"Mr. Logan, you will take command... of the saucer section."
- - Geordi La Forge
"We MISSED!"
- - Worf
"So what went wrong? Where are its creators? Where are the people of Minos?"
"Once unleashed, the unit is...invincible - the perfect killing system."
"Too perfect... You poor fools - your own creation destroyed you!"
- - Picard, realizing the truth about Minos, and The Peddler
"Captain, Data's going to join you down there."
(Data jumps 11.75m down into the cavern, landing on his feet, unaffected)
"Data?"
"At your service, captain."
- - Riker, Picard and Data
"Relinquishing command, captain."
"As you were, Lieutenant."
"Sir?"
"Mr. La Forge, when I left this ship, it was in one piece. I would appreciate your returning it to me in the same condition. Do you concur, Number One?"
"Absolutely, sir."
- - La Forge, Picard, and Riker, just as Picard and Riker arrive on the battle bridge
Background information
Production history
- Revised final draft script: 22 January 1988
- Second revised final draft script: 25 January 1988
- Premiere airdate: 11 April 1988
- UK premiere airdate: 20th February 1991
Story and script
- Robert Lewin had originally meant "The Arsenal of Freedom" to develop the implied romantic relationship between Picard and Crusher. Roddenberry, however, nixed the idea, and Lewin cited Roddenberry's lack of interest in character development as his reason for leaving the show. Other sources have suggested that Lewin's departure may also have been stimulated by friction with Maurice Hurley, who adapted Lewin's story and wrote the episode's teleplay.
- The big emotional scene, with Picard and Crusher trapped in a cavern, was conveniently interrupted by a handy plot development before it could go beyond anything but the vaguest of hints. Originally, Crusher was going to reveal her true feelings to the gravely wounded Picard, but matters were switched so that Crusher was the injured party.
- This change worked, but the failure of the scene to make its intended point was frustrating not only to Lewin but to director Les Landau and to most viewers. The scene was further marred by a fact not readily discernible to viewers watching at home; it seems that the sand in the cavern was infested with fleas, which made the shoot an utterly miserable experience for Patrick Stewart and Gates McFadden, who were under constant attack by the minute bloodthirsty creatures. (Star Trek: The Next Generation Companion; Captains' Logs: The Unauthorized Complete Trek Voyages; Trek: The Unauthorized Behind-The-Scenes Story of The Next Generation)
- The closed captioning for this episode replaces the term "Ersalrope wars" with "Romulan wars."
Production


Dan Curry's son holding the original Echo Papa 607
- Director Les Landau whose first assignment as director was this episode, remembered, "...the episode..., was in creative turmoil and going through a massive, last-minute rewrite. In five years, that was the only time the company had to shut down because there was no shooting script to be shot. I was familiar with the sets, cast and crew, so although the script was late in appearing, I had all the knowledge and background to go ahead and do my job. To this day, 'Arsenal' still stands out as one of the better shows, certainly one of the shows with the most production value of any we've ever done. Fortunately, all the elements fell together on that first day. I had the total support of the cast, crew and company to go ahead and do the best job possible. The cast was, and has always been, totally supportive of working with and for me, and I can't say enough about their cooperation." (The Official Star Trek: The Next Generation Magazine Vol. 21, p. 41)
Continuity

The prop Minosian weapon, later re-used in Enterprise
- This episode marks the third appearance of one of the Enterprise-D's chief engineers, after Sarah MacDougal (TNG: "The Naked Now") and Argyle (TNG: "Where No One Has Gone Before", "Datalore"). In this case, it is Logan.
- The saucer separation was created completely by using stock footage from "Encounter at Farpoint".
- Footage of Jonathan Frakes (William T. Riker) from the scene with Rice was later used in the series finale "All Good Things..." so he could appear younger and beardless.
- This is the last episode in Season One to have red alert sounded and is also the last appearance of the old style red alert flashing lights. The old style red alert lights only flash on and off at the top and bottom, however, the next episode to have red alert sounded which will be "Where Silence Has Lease" will feature the regular lights that entirely flash on and off and will be used for the rest of the show's run.
- An Echo Papa 607 drone, holographically masquerading as Paul Rice, stated the USS Drake had a maximum speed of Warp 3, which would make it the slowest known starship in Starfleet in the 24th century.
- After "Angel One", this is the second and final episode to show La Forge in command.
- This is the first episode of the series to show Worf at the Enterprise-D's tactical station, a position he would be officially stationed at starting with "Skin of Evil" and would remain there for the rest of the series and Star Trek Generations.
Sets, props and costumes
- The miniature of the Echo Papa 607 was built by visual effects supervisor Dan Curry, using an old L'Eggs pantyhose container and a discarded shampoo bottle. (Star Trek Encyclopedia, TNG Season 1 DVD special feature "Memorable Missions")
- The prop for the big surface cannon that had been used to melt tritanium, speculated by Riker for being a demonstration model for a potential buyer, was a prop rented from Modern Props. It was later on seen again in ENT: "Demons" as a 22nd century mining laser used on Luna.
Cast and characters
- Wesley Crusher (Wil Wheaton) does not appear in this episode.
Reception
- A mission report for this episode by John Sayers was published in The Official Star Trek: The Next Generation Magazine Vol. 6, pp. 53-56.
Video and DVD releases
- Original UK VHS release (two-episode tapes, CIC Video): Volume 11, catalog number VHR 2440, 8 April 1991
- UK re-release (three-episode tapes, Paramount Home Entertainment): Volume 1.7, catalog number VHR 4648, 7 September 1998
- As part of the TNG Season 1 DVD collection
- As part of the TNG Season 1 Blu-ray collection
Links and references
Starring
Also starring
- LeVar Burton as Lt. Geordi La Forge
- Denise Crosby as Lt. Tasha Yar
- Michael Dorn as Lt. Worf
- Gates McFadden as Doctor Beverly Crusher
- Marina Sirtis as Counselor Deanna Troi
- Brent Spiner as Lt. Commander Data
Guest stars
- Vincent Schiavelli as Minosian peddler
- Marco Rodriguez as Captain Paul Rice
- Vyto Ruginis as Lieutenant Logan
- Julia Nickson as Ensign Lian T'Su
- George De La Peña as Lieutenant junior grade Orfil Solis
Uncredited co-stars
Stunt doubles
- Laurie Creach as stunt double for Gates McFadden
- Dana Dru Evenson as stunt double for Denise Crosby
- John Nowak as stunt double for Patrick Stewart
- Unknown stunt performer as stunt double for Brent Spiner
Stand-ins
- James G. Becker - stand-in for Jonathan Frakes
- Darrell Burris - stand-in for LeVar Burton
- Dexter Clay - stand-in for Michael Dorn
- Jeffrey Deacon - stand-in for Patrick Stewart
- Susan Duchow - stand-in for Denise Crosby
- Nora Leonhardt - stand-in for Marina Sirtis
- Tim McCormack - stand-in for Brent Spiner
- Lorine Mendell - stand-in for Gates McFadden
References
Advanced Navigation; aquarium; arms dealer; Arvada III; away team; battle bridge; blood; bridge; cannon; clotting agent; desktop monitor; docking latch; Drake, USS; Echo Papa 607; emergency power; Ersalrope Wars; extinction; fish; fog; force field; Galaxy-class; Galaxy class decks; heat shield; hologram; Howard, Felisa; Howard, Isabel; Howard, Paul; light cruiser; Livingston; Lollipop, USS; Lorenze Cluster; medical tricorder; meter; Minos; Minosian; number one; orbit; PADD; phaser; photon torpedo; planet; planetary defense system; ready room; ring; root; saucer module; saucer separation; sculpture; shock; skant; Starbase 103; stardrive section; Starfleet Academy; stasis; stasis field; The Annotated Shakespeare; transporter room; tricorder; tritanium; type 2 phaser; unnamed plants; viewscreen; VISOR; warp 3; weapon; wood
External links
- "The Arsenal of Freedom"
- "The Arsenal of Freedom" at Memory Beta, the wiki for licensed Star Trek works
- "The Arsenal of Freedom" at Wikipedia
- Template:IMDb-link
- ""The Arsenal of Freedom"" at MissionLogPodcast.com, a Roddenberry Star Trek podcast
| Previous episode: "Heart of Glory" |
Star Trek: The Next Generation Season 1 |
Next episode: "Symbiosis" |